2 Cinnamon Rolls a Day…

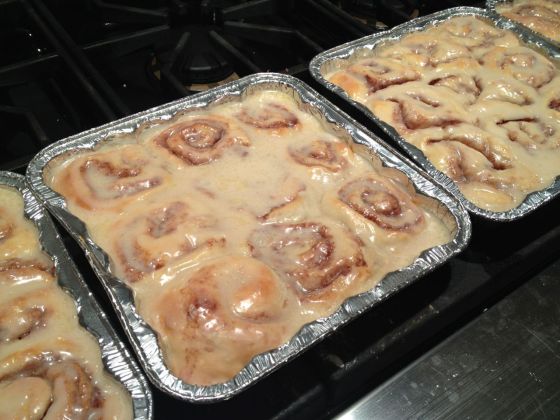
I have a new confectionery addiction: homemade cinnamon rolls.

IMG_6297

I’ve made the Pioneer Woman’s cinnamon roll recipe several times now.  It makes 45-50 rolls per batch.  Somehow, my family and I have plowed through dozens of cinnamon rolls since Christmas.  And I think I ate most of them.  How did that happen? They are just so stinking good, especially when I remember all of the ingredients (I was so caught up in the active yeast rising process that I forgot the leavening agents my first go-round, but was able to salvage them).  Most cinnamon rolls don’t have enough icing and develop a hard exterior.  These are swimming in icing.  They’re moist and spongy and perfect.  Every bite is like that coveted bite in the center of your regular old cinnamon roll.

In the last few weeks, my addiction has really taken an alarming turn and I’ve found myself having two cinnamon rolls a day for an unmentionable number of days in a row.  But hey, two cinnamon rolls a day keeps the doctor away, no?

…no?

Two cinnamon rolls a day keeps the doctor employed?

Well, I’ve been working out more (successfully) in recent weeks, too, so I’m sure it kind of cancels out.  Kind of.  I am happy to report that I’ve found a new class that’s slightly less lethal than circuit blast called “sculpt.” The only part that made my arms feel like straws was the diamond push-up sequence after 45 sets of arm weight exercises.  Other than that, the group exercise approach has been going well.

Last week, however, I suffered a minor setback in the midst of a cinnamon roll binge.  I pulled my groin putting on my yoga pants to go to sculpt. For real. I’m not sure if this is a reflection of my flexibility, coordination, physical fitness level, or an indication that my pants are too tight.  Maybe all of the above? Maybe a sign from God to lay off the cinnamon rolls?

I just went to hot yoga and feel like I’ve been wrung out like a sponge.  In a really good way.

I think I’ll have a cinnamon roll since I’m already wearing my yoga pants.

Y’all come back,

Sugarlump

Chicken Enchiladas

Anyone who knows me well knows that I could eat Mexican food for every meal.  This preference stems all the way back to a childhood of begging to go to Taco Bell or to make tacos at home as often as possible.  As I’ve gotten older, my Mexican palette has expanded from crunchy tacos with meat and sour cream ONLY to guacamole, enchiladas, Mole and fish tacos.  I can make a mean taco, but I decided it was time for me to tackle homemade enchiladas.

I’ve looked at lots of recipes and watched various celebrity chefs make them on TV. I’ve taken note of the components of enchiladas at my favorite Mexican spots and I concluded the following as I developed my recipe:

1)      The enchiladas must be chicken enchiladas.

2)      The chicken must be shredded so as to absorb the delicious sauce and flavor.

3)      The tortillas must be corn tortillas.  This is critical not just for taste, but also for texture.

4)      No cumin allowed.  I don’t know why, but I just don’t care for this flavor.

5)      Spicy is better, just not so spicy that you can’t feel your mouth.

6)      Cream cheese is an excellent addition to the sauce inside and on top of the enchiladas.  It adds a touch of richness, balances the heat of the hot peppers, and it’s a little bit tangy.  Nobody wants an enchilada lacking in flavor and cream cheese won’t let you down.

7)      The tortillas must be soft in order to roll them.  I prefer not to dunk them in a bunch of hot oil (the best way to keep them from splitting and to hold their shape) so I microwave them between a few damp paper towels.  Not so authentic, but it means I can eat enchiladas more often, which is the ultimate goal here.

Now that we’ve covered those details, I’m hungry.  Let’s make some chicken enchiladas.

These ingredients will soon be combined in nothing short of deliciousness.  Don’t forget the tomato paste like I did in this picture.  It’s a critical player.

Preheat the oven to 400 degrees.  Rub a boneless, skinless chicken breast with olive oil.

Sprinkle both sides with chili powder, paprika, season salt, and garlic salt.  Bake for 20-25 minutes or until cooked through.

After it’s done, allow the chicken to cool for a few minutes.

Then, using your best tools (your clean hands) shred the chicken.

Chop up onion, garlic and jalapeno, seeds and all.  Please try not to touch your face until you’ve thoroughly washed your hands or you will be very sorry.  I speak from experience.

Sauté onion in olive oil over medium heat until translucent.

Then throw in the garlic and half of the jalapeno, allowing them to soften for about 30 seconds.

Sprinkle in the rest of the chili powder, paprika and season salt.

Drop in half of the cream cheese.

Pour in half of the chicken broth.

Plop in the tomato paste.

Stir all of that deliciousness together until combined.

Throw in the shredded chicken.

Let everything hang out together until the sauce has reduced a bit.  It should be thick and absorbed into the chicken.  It shouldn’t be too loose or assembling the enchiladas will be a disaster.

Once reduced, remove the chicken from the skillet and set it aside.

Then be lazy like me and throw the rest of the cream cheese into the same skillet.  This will actually catch some of that good flavor left in the skillet.  Laziness or genius? Most likely both.

Add in the remaining chicken broth and jalapenos.

Mix everything together and reduce until slightly thickened.

Microwave the stack of tortillas in damp paper towels for a minute or so on low power to soften them.

Then start assembling by placing 1/8 of the chicken mixture in each tortilla, rolling them up and placing them in the baking dish as you go.

I didn’t do the best job preventing these from tearing slightly.  Oh well.  Nothing a little bit of sauce and cheese can’t cover up.

Then cover the top of the enchiladas with the cream cheese sauce.

And then top ‘er off with the shredded cheese and bake the enchiladas for 15-20 minutes on 300 until the cheese melts.

Here is the final product.  Enjoy!

Y’all come back and visit,

Sugarlump

Ingredients:

  • 1 large boneless, skinless chicken breast
  • 2 tbsp Olive oil
  • 2 tsp chili powder
  • 1 tsp paprika
  • ½ tsp season salt
  • ¼ tsp garlic salt
  • 1 small onion, diced
  • 3 cloves garlic, minced
  • 1 jalapeno, minced
  • 2 tbsp tomato paste
  • 2 cup chicken broth
  • Approximately 2/3 package of cream cheese
  • 8 small corn tortillas
  • ½ cup shredded cheese

1)      Cover chicken breast in 1 tbsp olive oil and then season with 1 tsp chili powder, ½ tsp paprika, ¼ tsp season salt and ¼ tsp garlic salt.  Bake at 400 degrees on a baking sheet for 20-25 minutes or until cooked through.  Let cool and then shred chicken.

2)      Sauté onion in 1 tbsp of olive oil until translucent over medium heat.  Add in garlic and ½ of the jalapeno, cooking for approximately 30 seconds before adding remaining chili powder, paprika, and season salt.  Add in 1/2 of chicken broth, the tomato paste, and 1/2 of cream cheese.  Mix together until combined.

3)      Add shredded chicken to mixture and allow to reduce until most liquid is absorbed.   Set aside in a separate bowl

4)      Using the same skillet, add remaining cream cheese, chicken broth and jalapeno pepper, whisking together until incorporated.  Let thicken.

5)      Wrap stacked tortillas in damp paper towels and heat in microwave until soft.

6)      Assemble tortillas, placing them in a baking dish.  Once all tortillas are assembled, cover them with cream cheese sauce and shredded cheese.

7)      Bake at 300 degrees for 15-20 minutes or until cheese is melted.

Hearty Turkey Chili

I love a hearty chili in the winter.  I do not, however, enjoy the taste/aroma of cumin, which is an ingredient found in most chili so I have come up with my own recipe.  I also tried to make it a little bit healthier than the standard chili by using ground turkey and chicken sausage.

Here’s what you’ll need.  Just about everything.

1 tablespoon olive oil

1lb ground turkey

2 links hot chicken sausage, casings removed

2 cans cannellini beans

1 can diced tomatoes with juice

½ can tomato paste

1 yellow onion, chopped

2 teaspoons garlic, minced

2 stalks celery, chopped

1 red bell pepper, seeded and chopped

1 jalapeno pepper, finely chopped

2 cubes/packets beef bouillon

1 cup beer

1 ½ teaspoon Worcestershire sauce

1 teaspoon hot pepper sauce

1 tablespoon chili powder

1 ½ teaspoons dried oregano

½ teaspoon dried basil

½ teaspoon kosher salt

½ teaspoon ground black pepper

½ teaspoon cayenne pepper

½ teaspoon paprika

½ teaspoon white sugar

2 cups chicken broth diluted with 2 cups water

½ cup sour cream

½ cup shredded sharp cheddar cheese

This recipe is especially healthy because you also get a workout chopping vegetables.

Chop the celery and put it in a bowl large enough for all of the chopped vegetables.

Then chop the bell pepper.

And then chop the onion.

Fight back the tears.

And then chop the jalapeno, seeds, ribs and all.  This chili is not for sissies.

This photo is slightly blurry because I was still crying from chopping the onion.

Like I said, this chili is not for sissies.

Finally, chop the garlic.

Behold that bowl of healthiness.

Then prepare your ingredients for battle.

I recommend pre-measuring all of your herbs and spices to make the dumping into the pot process go a little smoother.  I would also go ahead and open all of your canned goods and beer.

Speaking of beer…

I don’t drink beer so I made a special trip to Whole Foods nearby where they sell beer by the bottle instead of by the 6-24 pack.  I went and picked out Sam Adams’ Octoberfest and headed to the register.  The young guy at the register asked me if that was all.  I said yes.  He then kind of smirked at me and asked if I wanted him to open my beer for me.  I said no.  He didn’t know what to make of me.   I don’t either.

As it was time for me to prepare the beer to be poured into the pot, I realized that I don’t own a bottle opener.  I have an electric wine opener, but nothing to open this pesky bottle of beer.  I looked to see if my can opener had the grooves in it like some of them do to open a bottle.  Nope.  I searched all around my utensil drawer for something that might work.  Nothing.  I dug around in my tool box and tried using a screwdriver.  Not happening.  I was about to give up hope when I remembered I had a paint can opener from the last time I bought paint at Home Depot.  Wouldn’t you know that the other end of the paint can opener is a bottle opener?  I’m a little late to the party on this realization, but at least I was able to open that darn bottle of beer.

Ok, back to business.  Unpack the meat.  This means you must remove the raw chicken sausage from the casing.  I promise, it will be worth it in the end.

Heat up the olive oil and then throw the ground turkey and the chicken sausage into a large stock pot to brown it up real good.

Here’s what it will look like.  Yum!

Not.

I promise it gets better from here.

Throw in the beans…

The diced tomatoes…

The tomato paste…

All of those glorious vegetables that you chopped for hours…

The seasonings…

The tabasco sauce…

The Worcestershire sauce…

The be-ah….

Some of the chicken broth and water…

And by now your pot should be very full.

Put the lid on and let her go for 2-3 hours on medium-low heat, stirring occasionally and adding chicken broth and or water.

When it’s done, it should look like this.

Yum!

Serve it up with a nice, healthy dollop of sour cream and a sprinkling of cheese.

Y’all eat up,

Sugarlump

Here’s a more compact version without all of my helpful commentary:

Hearty Turkey Chili

Serves 6

1 tablespoon olive oil

1lb ground turkey

2 links hot chicken sausage, casings removed

2 cans cannellini beans

1 can diced tomatoes with juice

½ can tomato paste

1 yellow onion, chopped

2 teaspoons garlic, minced

2 stalks celery, chopped

1 red bell pepper, seeded and chopped

1 jalapeno pepper, finely chopped

2 cubes/packets beef bouillon

1 cup beer

1 ½ teaspoon Worcestershire sauce

1 teaspoon hot pepper sauce

1 tablespoon chili powder

1 ½ teaspoons dried oregano

½ teaspoon dried basil

½ teaspoon kosher salt

½ teaspoon ground black pepper

½ teaspoon cayenne pepper

½ teaspoon paprika

½ teaspoon white sugar

2 cups chicken broth diluted with 2 cups water

½ cup sour cream

½ cup shredded sharp cheddar cheese

Chop and pre-measure all ingredients.

Heat olive oil in a large pot over medium-high heat.  Once oil is hot, break up ground turkey and chicken sausage in pot and cook until browned.

Add rest of ingredients to pot and stir.  Cover and simmer over medium-low heat for 2-3 hours, adding 1 cup of chicken broth mixture and stirring every 20-30 minutes.

Remove from heat and serve with a dollop of sour cream and shredded sharp cheddar cheese.

Black Bean Soup

I love soup.  And I LOVE beans.  Therefore, I love LOVE bean soup. I have a great recipe for white bean soup, which is lovely in the fall and winter.  I’ll share it when the temperature drops below 70 degrees … Continue reading

Absurdly Simple Chocolate Sauce

When I crave chocolate, I MUST have it.  One chocolate item that really satisfies my cravings is chocolate sauce.  I’ve even been known to eat it straight.  I am not ashamed.  Dark chocolate is good for you. Now, I am … Continue reading

Granny’s Chocolate Pie

This is one of my granny’s specialties.

My granny is a great baker and while the rest of my family thinks her pecan pie and her butterscotch pie are unrivaled, I would take her chocolate pie over those two any day.

She makes a chocolate pie every time I come to visit and I always look forward to it.  There’s just nothing else quite like it.

When I make her chocolate pie, I ignore the meringue because that just dilutes the wonderful, rich chocolate.  But for those who are serious about pretty pies, I have included the meringue in the recipe.

While the pie is not that hard to make, there are a few tricks that are critical.  It just so happens that these tricks are not listed in my granny’s recipe as submitted to a local cookbook.  Though some people leave out ingredients and steps so no one can steal their thunder, I don’t think this was intentional on my granny’s part.  She has just made this pie so many times in her life that I bet she didn’t even realize some of the things that she does that make it just so.

Consequently, I had to make the pie with her several times before I had all of the right steps and ingredients.  I have notes scribbled all over the recipe in the cookbook.  One thing that she does is make 1 ½ times the recipe ingredients for a fuller pie.  So, for the sake of simplicity, I have listed the ingredients as she and I always make them instead of trying to remember to multiply all of the measurements by 1 ½.  Brilliant, right?

She taught me to make this pie several years ago and then she later taught my cousin.  Wouldn’t you know that she has changed the recipe in the last year?

She added cornstarch, which I think makes it too thick and robs it of its velvety goodness.  Apparently, there is also cream of tartar and marshmallow fluff in the meringue. This was news to me, but I don’t make the meringue anyway, so I’m not going to get all worked up about it.

Here is what you will need:

Ingredients:

9” pie crust

1 ½ cups sugar

3 ½ tbsp. all-purpose flour

1 ½ cups milk (best made with whole milk)

4 ½ tbsp. cocoa powder

Smidgen of salt

5 eggs, separated

2 tbsp. butter

1 tsp. vanilla

Pinch of cream of tartar

3 tbsp. marshmallow creme

I forgot to pull out the marshmallow creme for the picture.  Sorry about that.  Also, the sugar and flour seem to be a little shy as they hide behind the cornstarch that I would recommend you not use.  I should also note at this point that my granny does not put any salt in the pie, but I feel like just the tiniest amount really boosts the chocolate-y-ness.

So, here we go:

Bake off the pie shell according to the package instructions.  Or, if you would like to blind bake a homemade crust, knock yourself out.

Meanwhile, combine dry ingredients in the pot that will be the top half of your double boiler.

Separate eggs.  Set egg whites aside for meringue.

Combine half of milk and yolks…

…and whisk until completely incorporated (i.e. no yolk bits that could cause lumps in the pie.  Your granny will be very upset if you are not careful about this. Trust me, I speak from experience.)

Now here is some tricky business that my granny does not have written down anywhere, but it is the secret to having a smooth pie filling: pour egg and milk mixture through a strainer into dry mixture.

Because we told Granny to sit down as we prepared the pie so we could try to make it ourselves, there was a lot of back seat driving.  Apparently, we weren’t straining the eggs correctly…..but the pie turned out fine.

Assure your grandma that you’ve got things under control and then add the other half of the milk through the strainer.

And then give it a big ol’ stir to let the ingredients get to know each other.

Then put the mixture on the stove and stir. I should mention that my granny has a bizarre pot (pictured) that I believe was once part of a pressure cooker that somehow functions similarly to a double boiler so we always use this to make pie fillings.  One less thing to clean.

Now, you may want to start out with a whisk to make sure all of the ingredients incorporate, but then switch to a spoon and stir the mixture over medium-low heat constantly until the mixture has thickened.  Be sure to scrape the bottom of the pot gently so thickened parts don’t stick to the bottom of the pot and burn.

If you are impatient when it comes to eating chocolate like I am, you may think the filling is done when the mixture has a little bit of body to it, but you would be incorrect.  The mixture is not adequately thickened until you can see the bottom of the pot for a few seconds in the wake of your spoon when you scrape it against the pot.

As the mixture begins to thicken, you may add the butter and vanilla for a nice touch of richness because the chocolate is not rich enough already. Ha.

Continue cooking until the mixture achieves the viscosity described above.

Let cool a bit and then pour into baked pie shell.

Let pie cool completely before preparing meringue.  Or just let it cool until it’s just warm and eat a slice without any of that silly meringue.  Suit yourself.

Please lick the pot as you wait. It would be a sin to let any chocolate go to waste.

My cousins, sister and I have licked many a chocolate pie pot in our days.  We were caught chocolate-handedwhen this photo was taken a few years ago.

If you elect to make a sky-high meringue as my cousin Lauren did, beat the egg whites with a pinch of cream of tartar on high until they form peaks when you pull the whisk out.  Then, add marshmallow creme 1 tablespoon at a time.

I forgot to take a picture of this step because I was still licking the pot.

Next, using a spatula, make your meringue real purty on the pie.  Then bake it in a 400 degree oven until the meringue peaks start to brown.

Let pie cool and then devour.

Even though I promptly slid the meringue off my pie when I ate a piece, I have to admit that my cousin did a lovely job with the meringue.

Please enjoy.

Y’all come back now, ya hear?

Sugarlump